|
|
|

Construction
A SCV must work on constructing new buildings until the building is finished. During the construction
period, the SCV is still vulnerable to attack. If the SCV stops working or is destroyed, the partially
completed building will remain until it is destroyed, cancelled, or another SCV starts to work on it
again. Only one SCV can build a structure at one time, but multiple SCVs can be used to repair a
damaged building.
Support
Terrans require Supply Depots to provide support for their troops. Each Supply Depot provides 8 Supply,
and each Command Center provides 10 Supply. It's vital to keep a close eye on your available Supplies
to make sure you always have enough to build new troops, especially at the beginning of the game.
A halt in the combat unit production caused by not having enough supply available can make a huge difference.
Critical Damage
The hodge-podge circuitry and components used in Terran buildings make them easy to repair but
they can burn up if left alone after being severely damaged in an attack.
Once a Terran building has been damaged into the "red zone" (reduced to about 1/3 Hit Points, red wire frame)
it will slowly lose hit points until it reaches 0 and is destroyed.
You must repair it until it is in the "yellow zone" or greater to stop the decaying process of
the building. Note that this only applies to Terran buildings, not units.
Upgrades
You can only research one upgrade at a time at any building, and the wide variety of Terran upgrades
means that it can take a while to research everything. It's usually a good idea to build at least
two Armories (they are very cheap) and you might want to build three to upgrade faster. Multiple
Engineering Bays are less useful but could be helpful if you plan on using a lot of Marines.
Lifting Off (or, "That's it, I'm outta here!")
If you look at most the Terran Buildings you will notice that many have the
Lift-Off command available. These
buildings are capable of limited flight, and while slow and vulnerable in the air their mobility can
be used both for rapid expansion and to flee from enemy ground troops. The Command Center, Barracks,
Engineering Bay, Factory, Starport, and Science Facility are all capable of flight.
Buildings may only land on open, buildable land. You cannot land buildings just anywhere. You cannot land it on top of units either, so you cannot crush enemy units with buildings. Buildings have no attack of their own when flying so they are vulnerable to attack, and against most air units they will take even more damage from air-to-air attacks.
Some interesting uses for Lift-Off:
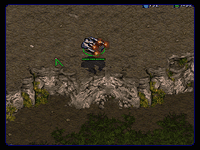
 In the first picture you cannot see the ground above your Siege Tanks.
By lifting off the Factory, the upper ground can be viewed and fired upon by the Siege Tanks.
You can even use buildings to scout the map if you have enough time on your hands,
or send them over the enemy's town to confuse or annoy them.
In the first picture you cannot see the ground above your Siege Tanks.
By lifting off the Factory, the upper ground can be viewed and fired upon by the Siege Tanks.
You can even use buildings to scout the map if you have enough time on your hands,
or send them over the enemy's town to confuse or annoy them.Remember that you can repair buildings in the air. Placing more SCVs on repairing will repair the buildings faster. If they are being attacked by air only units, you can repair them in the air until they land or get to their destination. This situation comes up occasionally.
Add-ons
There are six add-on buildings for the Terrans:
When constructing buildings capable of having add-ons be sure you keep the right side of the building open when you place it. While it's easy to lift-off the building and move it to a place where the add-on can be built, it's much faster to just build well the first time and leave the spot open so you don't have to move the building.
An add-on belongs to you as long as your building remains connected to it. If you lift-off your building, the add-on building becomes neutral. Any other Terran ally (or enemy) can land a building next to it and attach to it. It is possible to capture or use abandoned add-ons, although this isn't something that happens too often.
If the main building is destroyed, but the add-on remains, reuse the add-on by rebuilding in the same spot. For example if your Factory was destroyed but your Machine Shop was not, select a SCV and instruct it to build a Factory. A special placement box will come up indicating to you where you should build the Factory if you want it to attach to the Machine shop.
Sometimes you might want to use one building and switch between add-on buildings. This can be handy if you're trying to save some money and, for instance, want to alternate between building Ghosts and Battlecruisers. You can move your Science Facility between a Covert Ops lab and a Physics Lab. You can do the same thing with Command Centers if you want to launch a few Nukes, then go back to your ComSat Station.
Building Your Town
With Terrans, it's very important to build a nice tight defense to prevent both attacks on your workers
and your buildings. With careful planning, you can build your town such that a few Bunkers can cover
the entire area, especially with the U-238 upgrade for your Marines.
If you plan on building Bunkers, build your first Bunker in the middle of the SCVs mining resources. SCVs will be traveling between the Minerals and your Command Center while you're trying to place the Bunker, so it might be easier to stop your workers for a moment while you start on the Bunker. The reason to build it here is this is where the enemy usually tries to attack. If you build your Bunkers elsewhere, the enemy may cruise right past them and attack your SCVs, crippling your economy. If they target your buildings instead of going for the Bunker, you can lift them up and fly them over by the Bunker. If they attack the Bunker directly, you can easily select all the SCVs and instruct them to repair the Bunker as it is being attacked. As the game progresses, add more Bunkers around your town. They should be placed close enough to each other that they set up a nice crossfire. Buildings should be placed around the Bunkers to make them more difficult to reach, especially by melee units like Zealots and Zergling.
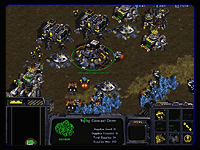
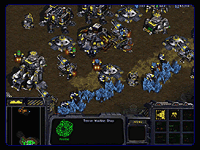
The first formation shown above allows the SCVs to mine easily while making it more difficult for the enemy to attack your resources. You can further add to this type of defense by building Missile Turrets evenly around it, and placing Siege Tanks in Siege Mode around the base. Be careful to leave room for the ComSat Station and any other add-ons when you are building. A common mistake is to place a building to the right of your Command Center, which forces you to destroy it or move the Command Center later.
The next two images show the town as its defenses are bolstered by Tanks and Missile Turrets. Although the Bunkers (and possibly a few Goliaths) are the town's primary air defense, the Missile Turrets are used for extra firepower and detection. With good tower coverage, it will be very difficult for anyone to sneak cloaked units into the base.
Securing High Ground
Terrans can easily and quickly secure high ground from all sorts of attacks.
It's important to not only use Siege Tanks, but Marines/Goliaths as well as Missile Turrets
for cloak detection and support fire.
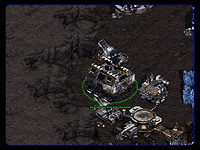
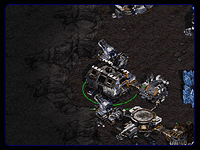
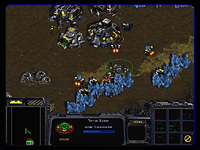
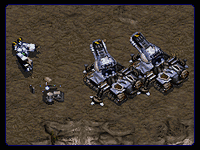
Above in the first picture, a Dropship carries two Siege Tanks with Siege Mode to higher ground.
The Siege Tanks unload then move into Siege Mode. In the second picture, the Dropship's second
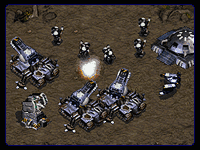
load carries some Marines with Stim Pack and a SCV. The SCV begins constructing a Missile
Turret. In the third picture, the high ground has been further enforced. This force should fight
off any transport invasion. Ghosts and Goliaths should be added for defense
against large air attacks. More SCVs should be brought up to more quickly repair damaged
units. If the attacker are using Mutalisks, more Bunkers and Marines should
be added.
Counters:
Terran